近期在期末考,所以更新会比较慢,这篇文章主要讲解如何实现消息发送功能。
之前的文章中我都没有去讲解客户端的代码。在讲解消息发送之前,我先介绍一下客户端的代码。
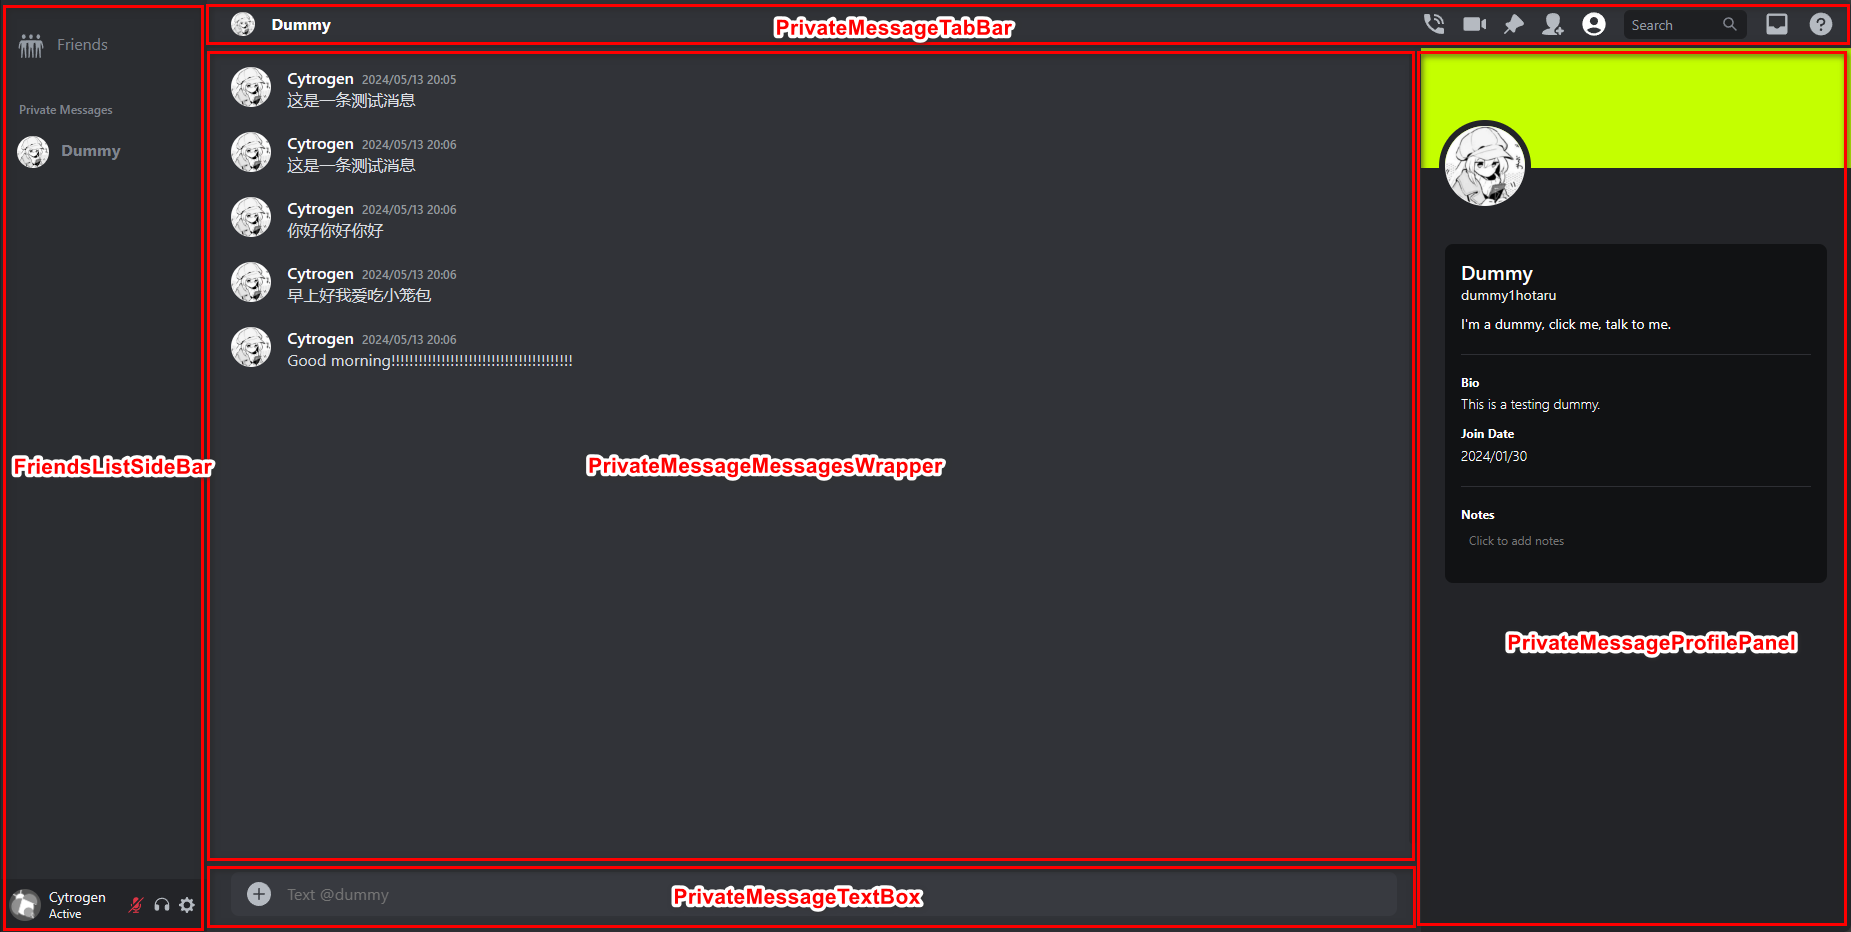
我的客户端中有一个 PrivateMessageChatPage 组件,用来显示和某个用户的私聊界面。这是最终的效果:
而 PrivateMessageChatPage 的布局是这样的:
目前只有 PrivateMessageMessagesWrapper 和 PrivateMessageTextBox 组件是有内容的,其他的组件都是空的。不过这不影响我们的消息显示。
首先导入这些组件和一些类型:
tsx
复制
1
2
3
4
5
6
7
8
import React , { useState } from 'react' import PrivateMessageTabBar from './Private_Message_Tab_Bar' import PrivateMessageMessagesWrapper from './Private_Message_Messages_Wrapper' import PrivateMessageProfilePanel from './Private_Message_Profile_Panel' import PrivateMessageTextBox from './Private_Message_Text_Box' import FriendsListSideBar from '../private_message_common/Friends_List_Sidebar' import { Message } from '../../types/interfaces' import { MessageContext } from '../context/Message_Context'
Message 类型:
typescript
复制
1
2
3
4
5
6
7
export interface Message { id ?: string senderId : string receiverId : string text : string timestamp : string }
每条消息都有一个 senderId、receiverId、text 和 timestamp。id 是消息的唯一标识符。
我们之后会根据 senderId 和 receiverId 来从服务端获取消息。
PrivateMessageChatPage 组件:
tsx
展开 复制
1
2
3
4
5
6
7
8
9
10
11
12
13
14
15
16
17
18
19
20
21
22
23
24
25
26
27
28
29
30
31
32
33
34
35
36
const PrivateMessageChatPage = ( const [receiverName, setReceiverName] = useState<string >('Dummy' ) const [newMessage, setNewMessage] = useState<Message | null >(null ) const addMessage = (message : Message setNewMessage (message) } return ( <MessageContext.Provider value ={{ newMessage , addMessage }}> <FriendsListSideBar /> <div className ="d-flex flex-column mx-0 h-100 w-100" > <div className ="d-flex flex-row" style ={{ height: '48px ', padding: '8px ', fontSize: '16px ', borderBottom: 'solid 3px rgba (45 , 47 , 52 )' }}> <PrivateMessageTabBar receiverUsername ={receiverName} setReceiverUsername ={setReceiverName} /> </div > <div className ="d-flex flex-row flex-fill align-items-stretch p-0" > <div className ="d-flex flex-column h-100 position-relative" style ={{ minWidth: 0 , minHeight: 0 , flex: '1 1 auto ' }}> <div className ="position-relative" style ={{ flex: '1 1 auto ', minHeight: 0 , minWidth: 0 , zIndex: 0 }}> <PrivateMessageMessagesWrapper receiverUsername ={receiverName} /> </div > <div className ="position-sticky bottom-0 w-100" style ={{ backgroundColor: 'rgba (49 , 51 , 56 )' }}> <PrivateMessageTextBox receiverUsername ={receiverName} addMessage ={addMessage} /> </div > </div > <PrivateMessageProfilePanel /> </div > </div > </MessageContext.Provider > ) } export default PrivateMessageChatPage
MessageContext 是一个 React 上下文,用来传递消息。
React 的 Context API 是一种在组件之间共享数据的方法,而不必通过组件树的逐层传递 props。
通过创建一个 Context 对象,然后使用 <MyContext.Provider> 组件将值传递给后代组件,可以在组件树中传递数据。
tsx
复制
1
2
3
4
5
6
7
8
9
import React from 'react' import { Message } from '../../types/interfaces' interface MessageContextType { newMessage : Message | null addMessage : (message : Message void } export const MessageContext = React .createContext <MessageContextType | undefined >(undefined )
在这个例子中,MessageContext 被用来在组件树中共享 newMessage 和 addMessage。
newMessage 是最新的消息。addMessage 是一个函数,用来添加消息。
我们的 PrivateMessageTextBox 组件是用来发送消息的,当用户在输入框中输入新的消息并发送时,组件会调用 addMessage 方法,将新消息添加到 MessageContext 中。而 PrivateMessageMessagesWrapper 组件会监听 newMessage 的改变,一旦 newMessage 出现了变化,新消息就会被添加到该组件的状态中用于显示。
这意味着,用户只要发送了消息,消息就会立即显示在界面上。
PrivateMessageTextBox 组件的 handleSendMessage 方法:
tsx
展开 复制
1
2
3
4
5
6
7
8
9
10
11
12
13
14
15
16
17
18
19
20
21
22
23
24
25
26
27
28
29
30
31
32
33
34
35
36
const PrivateMessageTextBox : React .FC <PrivateMessageTextBoxProps > = ({ receiverUsername } ) => { const [message, setMessage] = useState<string >('' ) const context = useContext (MessageContext ) if (!context) { throw new Error ('MessageContext is undefined' ) } const {addMessage} = context const handleChange = (e : ChangeEvent <HTMLTextAreaElement > setMessage (e.target .value ) } const handleSendMessage = async (e ?: FormEvent e && e.preventDefault () const jwtToken = localStorage .getItem ('jwtToken' ) const senderId = localStorage .getItem ('userId' ) if (!senderId) { throw new Error ('User ID not found in local storage' ) } const response = await UserService .getUserByUsername (jwtToken, receiverUsername) const receiver = response.data const privateMessage = { id : `${socket.id} ${Math .random()} ` , senderId : senderId, receiverId : receiver._id , text : message, timestamp : new Date ().toISOString (), } socket.emit ('privateMessageSent' , privateMessage) addMessage (privateMessage) setMessage ('' ) } }
这里的 UserService.getUserByUsername 方法进行了更改,需要多传入一个 jwtToken 参数。
typescript
复制
1
2
3
4
5
6
7
8
9
export const UserService = { getUserByUsername : (token : string | null , username : string { return api.get (`/users/username/${username} ` , { headers : { Authorization : `Bearer ${token} ` } }) }, getUserByUserId : (token : string | null , userId : string { return api.get (`/users/userid/${userId} ` , { headers : { Authorization : `Bearer ${token} ` } }) }, }
这是因为在上个文章中我实现了 @Public 装饰器,用来标记哪些路由是公开的。
根据用户的用户名或者 ID 来获取用户信息,都应当是私有的,所以需要传入 jwtToken。
OAuth 2.0 授权框架规范中定义了 Bearer 令牌类型,它是一种用于 OAuth 2.0 的访问令牌,用于对资源进行身份验证。任何持有 Bearer 令牌的人都可以访问与该令牌相关联的资源。
向服务端发送 privateMessageSent 事件后,立即调用 addMessage 方法,将消息添加到 MessageContext 中。
如果只是写了客户端的代码,那么消息只是在客户端显示,而不会真正的发送到服务端。要实现消息发送,我们需要在服务端中接收消息。
在 上个文章 的最后一个分段中,我实现了 Socket 模块。
Socket 用白话来说就是一个通道,客户端和服务端可以通过这个通道进行双向通信。双向通信和传统的 HTTP 请求不同,HTTP 请求是单向的,客户端向服务端发送请求、服务端返回响应。而 Socket 是双向的,客户端和服务端可以随时向对方发送消息。
上个文章中 SocketGateway(网关)订阅了 privateMessageSent 事件,但我只是简单的打印了一下消息,并没有去更进一步的处理。
typescript
复制
1
2
3
4
@SubscribeMessage ('privateMessageSent' )handlePrivateMessage (@MessageBody () data : any , client : Socket console .log ('Received private message:' , data, 'from' , client) }
这次我要详细地讲解如何实现消息传递。首先消息传递在技术上的流程是这样的:
客户端使用 Socket 向服务端发送 privateMessageSent 事件。
服务端在 SocketGateway 中接收到 privateMessageSent 事件后,依靠 MessagesService 将消息存储到数据库中。
为什么要细分出两个模块呢?因为我认为这两个模块的职责不同,Socket 模块负责处理 Socket 相关的逻辑,Messages 模块则负责处理消息的存储与获取。
上个文章中并没有细写 Messages 模块,我现在来写一下:
typescript
展开 复制
1
2
3
4
5
6
7
8
9
10
11
12
13
import { Module } from '@nestjs/common' import { MongooseModule } from '@nestjs/mongoose' import { Message , MessageSchema } from './message.schema' import { MessagesService } from './messages.service' import { MessagesController } from './messages.controller' @Module ({ imports : [MongooseModule .forFeature ([{ name : Message .name , schema : MessageSchema }])], providers : [MessagesService ], controllers : [MessagesController ], exports : [MessagesService ], }) export class MessagesModule {}
exports 是用来导出 MessagesService 的,这样其他模块就可以使用 MessagesService 了。刚才也说过,SocketGateway 需要使用 MessagesService 来存储消息。
我在这里做了一些修改,将 MessagesSchema 更改为了 MessageSchema。因为这个模型实际上是用来存储单一的消息,所以我认为它的名字应该是单数形式。同时,我将原先的 sender 和 receiver 更改为了 senderId 和 receiverId,因为我想通过用户的 ID 来查找用户,而不是直接使用用户对象。
typescript
展开 复制
1
2
3
4
5
6
7
8
9
10
11
12
13
14
15
16
17
18
19
import { Prop , Schema , SchemaFactory } from '@nestjs/mongoose' import { Document } from 'mongoose' @Schema ()export class Message extends Document { @Prop ({ required : true }) senderId : string @Prop ({ required : true }) receiverId : string @Prop ({ required : true }) text : string @Prop ({ default : Date .now }) timestamp : Date } export const MessageSchema = SchemaFactory .createForClass (Message )
在这里,我添加了一个 timestamp 字段,用来记录每条消息的发送时间。
在客户端里,我将发送给服务端的消息数据结构设计为以下形式:
typescript
复制
1
2
3
4
5
6
7
{ id : `${socket.id} ${Math .random()} ` , senderId : senderId, receiverId : receiver._id , text : message, timestamp : new Date ().toISOString (), }
这里,我也添加了一个 timestamp 字段。这是因为我希望客户端在发送消息后,能立即在界面上显示这条消息,而不需要等待服务端的响应。
值得注意的是,我选择让客户端直接显示消息,而没有等待服务端存储消息并返回。这样做的结果是,客户端显示的时间戳实际上是客户端发送消息的时间,而不是服务端存储消息的时间,除非用户刷新了页面,让客户端向服务端请求实际的数据。
接着我们要在 MessagesService 中添加一个方法,用来存储消息。
typescript
展开 复制
1
2
3
4
5
6
7
8
9
10
11
12
13
14
15
16
17
18
19
20
21
22
23
24
import { Injectable } from '@nestjs/common' import { InjectModel } from '@nestjs/mongoose' import { Model } from 'mongoose' import { Message } from './message.schema' import { CreateMessageDto } from './dto/create-message.dto' @Injectable ()export class MessagesService { constructor (@InjectModel (Message.name) private messageModel : Model <Message > async create (createMessageDto : CreateMessageDto ): Promise <Message > { const createdMessage = new this .messageModel (createMessageDto) return await createdMessage .save () .then (async (message) => { console .log ('Message saved:' , message) return message }) .catch ((error : any { console .log ('Error saving message:' , error) throw error }) } }
CreateMessageDto 是一个数据传输对象,用来传输消息的数据。
typescript
复制
1
2
3
4
5
export class CreateMessageDto { readonly text : string readonly senderId : string readonly receiverId : string }
在这个方法中,我只需要 text、senderId 和 receiverId 这三个字段。
接着使用 save 方法来保存消息,如果保存成功则返回消息,否则抛出错误。
最后就是在 SocketGateway 中调用 MessagesService 的 create 方法:
typescript
展开 复制
1
2
3
4
5
6
7
8
9
10
11
12
13
14
15
import { MessagesService } from '../messages/messages.service' export class SocketGateway implements OnGatewayInit { constructor ( private messagesService : MessagesService , ) {} @SubscribeMessage ('privateMessageSent' ) async handlePrivateMessage (@MessageBody () data : any ): Promise <void > { await this .messagesService .create ({ senderId : data.senderId , receiverId : data.receiverId , text : data.text }) } }
别忘了 SocketModule 中要导入 MessagesModule,才能让 SocketGateway 使用 MessagesService。
typescript
复制
1
2
3
4
5
6
7
8
9
10
import { Module } from '@nestjs/common' import { SocketService } from './socket.service' import { SocketGateway } from './socket.gateway' import { MessagesModule } from '../messages/messages.module' @Module ({ imports : [MessagesModule ], providers : [SocketGateway , SocketService ], }) export class SocketModule {}
这样服务端就可以接收到客户端发送的消息,并将消息存储到数据库中。
用户点击他们和其他用户的私聊界面时,我们需要从服务端获取他们之间的所有消息。
在我的应用中,因为是仿照 Discord 的,所有的私聊路由都是 /channel/@me/:id 这种形式的。id 是接收者的 ID。
也就是说我们可以让服务端有一个 GET 路由,当客户端访问这个路由时,服务端会返回当前用户和 id 用户之间的所有消息。
在 MessagesController 中添加 GET 路由:
typescript
展开 复制
1
2
3
4
5
6
7
8
9
10
11
12
13
14
15
16
17
import { Controller , Get , Param , Request } from '@nestjs/common' import { Request as ExpressRequest } from 'express' import { MessagesService } from './messages.service' @Controller ('messages' )export class MessagesController { constructor (private readonly messagesService : MessagesService @Get (':senderId/:receiverId' ) async getMessages ( @Request () req : ExpressRequest , @Param ('senderId' ) senderId : string , @Param ('receiverId' ) receiverId : string , ) { return await this .messagesService .getMessages (senderId, receiverId) } }
当客户端访问 /api/messages/:senderId/:receiverId 时,服务端会返回当前用户(senderId)和 receiverId 用户之间的所有消息。
MessagesService 中添加 getMessages 方法:
typescript
展开 复制
1
2
3
4
5
6
7
8
9
10
11
12
13
14
15
16
async getMessages (senderId : string , receiverId : string return this .messageModel .find ({ senderId : senderId, receiverId : receiverId, }) .exec () .then ((messages ) => { console .log ('Messages found:' , messages) return messages }) .catch ((error : any { console .log ('Error finding messages:' , error) throw error }) }
客户端里也添加一个方法,专门访问 /api/messages/:receiverId:
typescript
复制
1
2
3
4
5
export const MessageService = { getMessagesByUserId : (token : string | null , senderId : string | null , receiverId : string { return api.get (`/messages/${senderId} /${receiverId} ` , { headers : { Authorization : `Bearer ${token} ` } }) }, }
现在回到客户端的 PrivateMessageMessagesWrapper 组件。我们需要明白这个组件的职责是什么:
当用户点击某个用户的私聊界面时,组件会向服务端请求 senderId 用户和 receiverId 用户之间的所有消息。
当用户发送消息时,组件会将新消息添加到消息列表中来立即显示。
首先以最基础的形式来写这个组件:
tsx
展开 复制
1
2
3
4
5
6
7
8
9
10
11
12
13
14
15
16
17
18
19
20
21
22
23
24
25
26
27
28
29
30
31
32
33
34
35
36
37
38
39
40
41
42
43
44
45
46
47
48
49
50
51
52
53
54
55
56
57
58
59
60
61
62
63
64
65
66
67
68
69
70
71
72
73
74
75
76
77
78
79
80
81
82
83
84
85
86
87
88
89
90
91
92
93
94
95
96
97
98
99
100
101
const PrivateMessageMessagesWrapper : React .FC <PrivateMessageMessagesWrapperProps > = ({ receiverUsername } ) => { const [messages, setMessages] = useState<Message []>([]) const currentUser = useSelector ((state : { auth: { user: UserProfile } } state.auth .user ) return ( <div className ="d-flex flex-column position-absolute top-0 bottom-0 overflow-y-scroll overflow-x-hidden" style ={{ left: 0 , right: 0 , overflowAnchor: 'none ' }}> <ol className ="p-0 m-0" style ={{ flex: 1 , minHeight: '0 ', listStyle: 'none ' }}> {messages.map((message, index) => ( <li key ={message.id || index } className ="position-relative mx-2" style ={{ outline: 'none ' }}> <div className ="position-relative" style ={{ marginTop: '1.0625rem ', minHeight: '2.75rem ', paddingTop: '0.125rem ', paddingBottom: '0.125rem ', paddingLeft: '72px ', paddingRight: '48px !important ', wordWrap: 'break-word ', userSelect: 'text ', }}> <div className ="position-static ms-0 ps-0" style ={{ textIndent: 'none ' }}> {/* User's avatar */} <img src ={imgURL} className ="position-absolute overflow-hidden" style ={{ pointerEvents: 'auto ', textIndent: '-9999px ', left: '16px ', marginTop: 'calc (4px-0.125rem )', width: '40px ', height: '40px ', borderRadius: '50 %', cursor: 'pointer ', userSelect: 'none ', }} alt ="" /> {/* Username and message time */} <h3 className ="overflow-hidden position-relative p-0 m-0 d-flex flex-row align-items-center" style ={{ display: 'block ', lineHeight: '1.375rem ', minHeight: '1.375rem ', whiteSpace: 'break-spaces ', }}> <span className ="me-1 fs-6 position-relative overflow-hidden text-white" style ={{ fontWeight: '500 ', display: 'inline ', verticalAlign: 'baseline ', outline: 'none ', }}> {message.senderId === currentUser._id ? currentUser.username : receiverUsername} </span > <span className ="ms-1" style ={{ fontSize: '0.75rem ', height: '1.25rem ', verticalAlign: 'baseline ', display: 'inline-block ', cursor: 'default ', pointerEvents: 'none ', outline: 'none ', fontWeight: '500 ', color: 'rgba (148 , 154 , 158 )', }}> <time dateTime ={message.timestamp.toString()} > {formatDate(message.timestamp)}</time > </span > </h3 > </div > {/* Message Content */} <div className ="overflow-hidden position-relative fs-6 p-0 m-0" style ={{ userSelect: 'text ', whiteSpace: 'break-spaces ', wordWrap: 'break-word ', marginLeft: 'calc (-1 * 72px )', paddingLeft: '72px ', textIndent: '0 ', lineHeight: '1.375rem ', color: 'rgba (219 , 222 , 225 )', }}> <span > {message.text}</span > </div > </div > </li > ))} </ol > </div > ) }
messages 是该组件的状态,用来存储所有的需要被显示的消息。消息的数据结构是 Message,上面已经定义过了。currentUser 是从 Redux 中提取出的当前用户的信息,包括了用户的 ID 和用户名。
这个组件的底层逻辑是这样的:
map 遍历 messages 数组,对每一条消息都生成一个 li 元素。每一条消息都包含了用户的头像(这里写死了)、用户名(如果消息的 senderId 和当前用户的 ID 相同,那么消息的用户名就是当前用户的用户名,否则就是接收者的用户名)、消息发送时间和消息内容。
消息发送时间是通过 formatDate 函数格式化的:
typescript
复制
1
2
3
4
5
6
7
8
9
10
export const formatDate = (timestamp : string const date = new Date (timestamp) const year = date.getFullYear () const month = String (date.getMonth () + 1 ).padStart (2 , '0' ) const day = String (date.getDate ()).padStart (2 , '0' ) const hours = String (date.getHours ()).padStart (2 , '0' ) const minutes = String (date.getMinutes ()).padStart (2 , '0' ) return `${year} /${month} /${day} ${hours} :${minutes} ` }
那么我们该如何获取消息、并将消息添加到 messages 中呢?
当 PrivateMessageMessagesWrapper 组件被挂载时,以及 receiverUsername 发生变化时,我们都需要向服务端请求消息:
tsx
展开 复制
1
2
3
4
5
6
7
8
9
10
11
12
13
14
15
16
17
18
useEffect (() => { const fetchMessages = async ( const jwtToken = localStorage .getItem ('jwtToken' ) const senderId = localStorage .getItem ('userId' ) const response = await UserService .getUserByUsername (jwtToken, receiverUsername) const receiver = response.data try { const res = await MessageService .getMessagesByUserId (jwtToken, senderId, receiver._id ) setMessages (res.data ) return res.data } catch (err) { console .error (err) } } fetchMessages ().then ((r ) => console .log ('Messages fetched:' , r)) }, [receiverUsername])
这里我使用了 useEffect 钩子,当 receiverUsername 发生变化时,就会调用 fetchMessages 方法。
fetchMessages 方法会向服务端请求 senderId 用户和 receiverId 用户之间的所有消息,并将消息存储到 messages 中。
不只是如此,先前我们在 PrivateMessageTextBox 组件中发送消息时,会将用户自身发送的消息添加到 MessageContext 中。PrivateMessageMessagesWrapper 组件同样也需要去监听用户自身发送的消息,并将这些消息添加到 messages 中:
tsx
复制
1
2
3
4
5
6
7
8
9
10
11
const context = useContext (MessageContext )if (!context) { throw new Error ('MessageContext is undefined' ) } const { newMessage } = contextuseEffect (() => { if (newMessage) { setMessages ((prevMessages ) => [...prevMessages, newMessage]) } }, [newMessage])
当该被显示的消息超过了可视区域时,用户需要手动滚动到底部才能看到最新的消息。这是不友好的,我们应当让用户看到最新的消息。
tsx
展开 复制
1
2
3
4
5
6
7
8
9
10
11
12
13
14
15
16
17
18
19
20
const endOfMessagesRef = useRef<null | HTMLSpanElement >(null )const prevMessagesLength = useRef<number >(0 )useEffect (() => { if (endOfMessagesRef.current && messages.length > prevMessagesLength.current ) { endOfMessagesRef.current .scrollIntoView ({ behavior : 'smooth' , block : 'nearest' , inline : 'start' }) } prevMessagesLength.current = messages.length }, [messages]) return ( <div > <ol > {messages.map((message, index) => ( // ... ))} <span ref ={endOfMessagesRef} /> </ol > </div > )
我使用了 useRef 来创建一个 endOfMessagesRef 引用,用来指向消息列表的最底部。当 messages 数组的长度发生变化时,我就将 endOfMessagesRef 滚动到可视区域。
prevMessagesLength 也是一个 useRef,用来存储上一次 messages 的长度。这个长度在回调函数的最后会被更新为当前的 messages 的长度。
useEffect 的回调函数会先检查 endOfMessagesRef.current 是否存在,以及 messages 的长度是否大于 prevMessagesLength.current。如果两个条件都满足,就将 endOfMessagesRef.current 滚动到可视区域。
scrollIntoView 方法是一个 DOM 方法,用来将元素滚动到可视区域。
behavior 决定了滚动的动画效果,smooth 表示平滑滚动。block 决定了元素在垂直方向上的对齐方式,nearest 表示将元素对齐到最接近的边缘。inline 决定了元素在水平方向上的对齐方式,start 表示将元素对齐到起始边缘。
span 标签是一个空元素,用来占位,需要放在 ol 标签的最后一个子元素后面。
在用户刷新浏览器后,Redux 的状态会丢失。这是因为 Redux 的状态是存储在内存中的,刷新浏览器后内存被清空,状态也就丢失了。
由于我们已经在 localStorage 中存储了用户的 jwtToken 和 userId,我们可以从 localStorage 中获取这些信息,并重新设置 Redux 的状态。
tsx
展开 复制
1
2
3
4
5
6
7
8
9
10
11
12
13
14
15
import { useAppDispatch } from './redux/store' import { setUserDetails } from './redux/actions/authActions' function App ( const dispatch = useAppDispatch () useEffect (() => { const token = localStorage .getItem ('jwtToken' ) const userId = localStorage .getItem ('userId' ) if (token && userId) { dispatch (setUserDetails (userId)) } }, [dispatch]) }
setUserDetails 是一个 Redux 的 action,用来设置用户的 ID。
typescript
展开 复制
1
2
3
4
5
6
7
8
9
10
11
12
13
14
15
export const setUserDetails = (userId : string return async (dispatch : Dispatch ) => { try { const token = localStorage .getItem ('jwtToken' ) const response = await UserService .getUserByUserId (token, userId) if (response.status === 200 ) { dispatch (setCurrentUser (response.data )) } else { console .log (response.data .message ) } } catch (error) { console .error (error) } } }
此处使用了 localStorage 中的 userId 来向服务端请求了用户的信息,并将用户信息存储到 Redux 的状态中。
服务端向客户端返回的 jwtToken 是有过期时间的。当 jwtToken 过期后,客户端再向服务端发送请求时,服务端会返回 401 Unauthorized 错误。
在这种情况下,我们应当让用户重新登录。我在 axios 的拦截器中添加了一个拦截器,用来处理 401 错误。
typescript
展开 复制
1 2 3 4 5 6 7 8 9 10 11 12 13 14 15 api.interceptors .response .use ( (response ) => { return response }, (error ) => { if (error.response ) { if (error.response .status === 401 && error.response .statusText === 'Unauthorized' ) { localStorage .removeItem ('jwtToken' ) window .location .reload () } } return Promise .reject (error) }, )
window.location.reload() 会重新加载页面,没有 jwtToken 的情况下,用户会因为路由守卫而被重定向到登录页面。
User 接口User 接口的 id 字段改为 _id:
typescript
复制
1
2
3
4
5
6
7
export interface User { _id ?: string emailAddress ?: string username : string password ?: string access_token ?: string }
这是因为在 MongoDB 中,每个文档都有一个 _id 字段,用来唯一标识文档。为了可以直接将 MongoDB 中的文档映射到 User 接口,我将 id 改为了 _id。
我使用的是 Edge 浏览器,它的滚动条不能说难看,只能说和好看不搭边。所以我在 index.css 中自定义了滚动条的样式:
css
展开 复制
1
2
3
4
5
6
7
8
9
10
11
12
13
14
15
16
17
18
19
20
21
22
23
24
::-webkit-scrollbar { width : 16px ; height : 16px ; } ::-webkit-scrollbar-track { background : hsl ( 220 calc ( 1 * 6.5% ) 18% / 1 ); margin-bottom : 8px ; border : 4px solid transparent; background-clip : padding-box; border-radius : 8px ; } ::-webkit-scrollbar-thumb { background : hsl ( 225 calc ( 1 * 7.1% ) 11% / 1 ); background-clip : padding-box; border : 4px solid transparent; border-radius : 8px ; min-height : 40px ; } ::-webkit-scrollbar-corner { background : transparent; }
这些样式是根据 Discord 的滚动条样式来写的。